

Homemade scented candles are a great way to add wonderful light and ambiance to any room in your house. Even making homemade candles as a gift for someone else is a perfect way to give a friend or family member a personalized and unique present that comes from you with care and love.
Knowing where to start can be a little daunting at first, however, here we provide some simple and effective tips to get you started on your candle making journey.
Candle Making Equipment:
Before you can get started, you will need to gather all the essential tools required to make your own scented candles from home. Regardless of the type of candle you are making, below are the basic equipment you will need to get started:
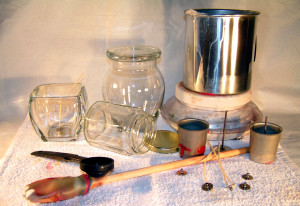
- Wax
- Wick
- Container or Mould
- Double boiler
- Scales
- Thermometer
- Color
- Fragrance
For more information on required candle making equipment, you can check out our more detailed articles here.
Prepare your Candle Making Workstation:
The first steps is to prepare your candle making workstation. To do this you will need a flat solid surface to work from. The kitchen bench is usually nice and easy to work from. However, whatever you are using as your workstation, this surface must be able to withstand heat. You could protect this surface by using old sheets, tarps, or even garbage bags.
Next, you will want to prepare your containers. Ensure the container surface is clean of any dust, dirt or residue. If using a glass container, you can use hot soapy water to clean. Once you have cleaned your containers make sure they are nice and dry before you start making your candles.
Making Your Homemade Scented Candles:
The following are our five simple steps to follow to make your own homemade scented candles.
Step One: Melt Your Wax
Firstly, measure out the amount of wax you will need using your scales. Each wax type weighs a little differently, and we provide guidance on these measurements in our EBook.
Melt this wax gently over the stove using your double boiler and monitor the temperature of your wax using your thermometer as you do not want to overheat your wax. Different wax types have different melt points, so be sure to monitor based on the type of wax you are using.
Step Two: Place Your Candle Wick
Your candle wick will need to be placed firmly to the bottom of your container or mold. An easy way to achieve this is to use a metal wick tab at the bottom of your wick. Some wicks will come pre-tabbed. However, if it does not you can tab your wick by treading the end of your wick through the tab hold and secure firmly with a pair of pliers.
Step Three: Add Candle Scent and Color
To make your Scented Candle you will need to add your fragrance to the melted wax. It is important to use a fragrance that is designed to be used in candle wax and can withstand high heat without combusting.
A general guide is to use approximately 8% fragrance to wax loading, depending on the strength of scent you wish to achieve. You do not want to use too much fragrance otherwise it might separate from your wax.
If you wish to add color to your candle, you can also do this now by adding it to your melted wax.
Gently stir your fragrance and color into your wax.
Step Four: Pour the Wax
Once your wax has melted and you have added your candle fragrance, it is now time to pour your wax into your containers. If making multiple candles, ensure to place your containers far enough apart so that there will be an even flow of air circulation around your jars as they cool.
Slowly pour your wax into your containers. Once you have poured your wax, you will want ensure your wicks are pulled nice and tight and are held firmly in the center of your jar. This will ensure the wick is set in the center of your candle. You can do this by wrapping the end of the wick around a peg, pencil or paddle pop stick.
Step Five: Set the Wax
Ideally you will want to allow your candle to set for at least 24 hours. Once set you can then trim the excess wick, leaving approximately quarter inch from the top of where the wax has set in your scented candle.
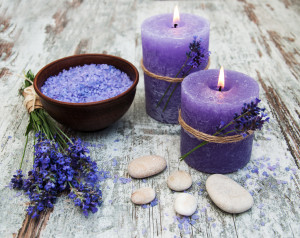
Finished product
Now you will have a beautifully finished homemade scented candle that you can either use for yourself or provide as a gift to someone else. Seeing the finished product is truly rewarding! We provide more details on making your own homemade candles and more on our Candle Advice site. If you would love to learn more, request your free report today.