Making your own candles from home not only allows you to create your very own unique style and finished product, but also helps you to save some money on purchasing expensive candles from the department store. Although this process does not mean you have to purchase or spend a lot of money on tools and equipment, there are a few items that will help make your candle making journey a lot easier.
Here we will discuss the basic candle making supplies you will need to start making your very own candles from the comfort of your own home. As your skills and requirements grow you can certainly add to this initial toolbox of essential equipment!
Item One: Wax
This will be the foundation of any type of candle that you make, and therefore it is important that you select a good quality wax. Flaked wax is the easiest to work with, however you can also get block wax which you can then chip into smaller pieces. The smaller the pieces you use, the easier it is for the wax to melt consistently.
If you are making candles that stand on their own, you will need a harder wax such as pillar wax. However, if you are making candles in a container, tin or glass jar then you can use a softer wax such as soy wax.
Item Two: Wicks
The wick is a very important component to your candle, and to be honest can be the trickiest element to get right when selecting the correct size and style of wick. Your wick should preferably be made of natural fibres and should be coated in wax. The wax coating on the wick will allow your wick to remain upright when burning.
There are a few elements that determine the style and size of wick you should use in your candle, including:
- Type of wax you are using
- Size (diameter) of the candle you are making
- Type of fragrance you are adding (i.e. the acidity will impact the burning of the wick)
- If color will be added or the candle will be left natural.
All the above elements impact the end performance of your candle wick. We know firsthand how daunting it can be when it comes to finding the perfect wick. We discuss many different types of wicks and provide easy-to-use testing solutions to help you gain the best results for your finished candle product in our eBook.
Item Three: Container or Mold
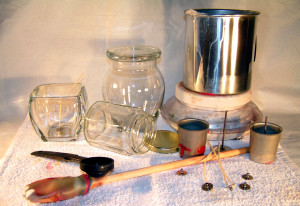
The type of container you use will depend on how you want your finished product to look like. These can come in all different shapes and sized, and there are many different types you can select from, such as:
- Glass jars
- Aluminum travel tins
- Terracotta pots
- Tealight cups
Just to name a few. Whatever style you decide upon, it important that your container should be non-flammable, should be able to withstand high heat, and is properly sealed as not to leak when the wax is melting. If you are making free-standing pillars ensure to choose a good quality candle mold.
Item Four: Double Boiler
This will be used to melt your wax in. You can either purchase one from a department store, or make your own double boiler by using a metal bowl (or smaller saucepan) over a large saucepan of boiling water. However, it is important to ensure no water mixes into your bowl of wax.
This method of melting wax is the easiest as it allows you to closely monitor the temperature of your wax as it melts. Remember to add additional water to your large saucepan if this starts to evaporate.
Item Five: Scales
A good quality scale is important to use when weighing your wax and fragrance oil. Either kitchen scales or digital scales are fine to use, however whichever you choose the important element is that it provides you with an accurate reading.
Item Six: Thermometer
There is some debate on the importance of using a thermometer when making your candles. However, we personally recommend using a thermometer, as this allows you to accurately monitor the temperature of your wax as it is heating, and when it has cooled enough to add your fragrance and then to pour into your mold or container. For all you perfectionists, you can go all out and purchase a fancy digital thermometer. However, a simple candy thermometer also works well for measuring the temperature of your melted wax.
These are what we consider essential pieces of candle making equipment you will need to begin your candle making journey. There are many more elements you will need over time and you may decide to get multiples of certain things so you can make larger batches of candles at the same time. We discuss everything you need in depth in our candle making eBook.


